A continuous drip water change system uses permanent plumbing to continuously and automatically change the water in one or more aquariums via a 24/7 drip. Drip water systems require two pipes into the aquarium area. One line of pipe comes from a water supply such as a municipal water supply or a well and supplies a slow “drip” of water to aquarium(s). The other piping line drains the “drip” from the aquariums. If you have certain types of house construction, you can do continuous (“drip”) water changes. This is the best way to do water changes by far.
Drip water changes do NOT replace good filtration. Let me repeat that:
.
Drip water changes do NOT replace good filtration.
.
In order to have healthy fish and crystal clear water one has to remove things like dissolved organic compounds from the water on the order of 50% every twelve hours. A drip system would need to literally pour the water in in a continuous stream to be the equivalent of a filter. So heavy filtration remains the key to a healthy aquarium. UV remains very useful in systems with a drip water change. A drip water change system is ONLY a water change system, not the equivalent of a filter.
Setup of a System
There are many ways to set up a continuous drip water system:
- A high-pressure system which has a high pressure to the aquarium, where a needle valve meters a small drip into the aquarium(s). Best used with well water.
- A low pressure system where the water flows through a pressure regulator before it enters the living space. The pressure regulator drops the pressure down to a low pressure. This low pressure then feeds to the aquarium(s) via a needle valve. Best used with well water.
- A low-pressure system where a level cut-off switch in another room (or a garage, porch, basement or crawl space) feeds water to a reservoir. The reservoir has an active biofilter or a micropump pumping conditioner to the reservoir. The feed is then out of the reservoir via a small low pressure pump (or gravity feed) which transports a small flow of water to the aquarium(s) through a needle valve. In order to equalize the flow one can use any of several float valve designs on the incoming water to the reservoir. They work best with a pressure reducer to 5 to 8 psi. Be sure to have an overflow to waste water in case the valve malfunctions. Best for municipal water which is chlorinated or has chloramine.
- The drain can be to the outside or to a house drain.
- There are many overflow devices which can reliably handle the aquarium(s) overflow to the drain if the tanks are not drilled.
All these variations can be made to work quite well.
The biggest challenge to using a drip system is that there needs to be a way of getting plumbing to the aquariums. If one’s house in on a concrete slab and the aquarium is on an inside wall with no bathroom on the same wall, drip systems are a problem. But if you have many aquariums in your basement, in a garage or in a separate building of their own, a drip system is quite feasible. A house on pier and beam construction or with a basement is also easily plumbed for a drip system.
Note that we recommend all the plumbing for the drip system which is inside the house be done in piping approved for use in potable water systems per the uniform building code. In most areas of the USA this is polyvinyl chloride (PVC), chlorinated polyvinyl chloride (CPVC), cross linked polyethylene (PEX) or copper tubing.
Do not use leak prone tubing systems along the lines of beer tubing, air line tubing, or garden drip systems. Do not use barbed fittings or compression fittings. Do not use corrugated “flex” tubing. Systems which do not use approved “to code” plumbing frequently fail and can cause a huge amount of damage. The damage is NOT covered by insurance if the plumbing is not up to code.
We use only schedule 40 PVC for both the supply lines and the drain lines. And we are religious about using both solvents and sandpaper to pre-treat the PVC joints so they can’t possibly fail. We have had two plumbers that failed to do this and two flooded houses as a result.
Also expect to spend some time in your local plumbing supply outfit figuring out the fittings for this. There are typically a lot of adaptors and transitions needed for a good installation. No one sells an “Aquarium Drip Irrigation System or Kit”.
High Pressure Systems
Use half inch schedule code approved piping to get to directly over the aquarium. Then transition to 1/4th inch NPT plumbing (obviously outside the USA this will be metric). Directly at the aquarium transition to two brass needle valves on a high pressure system or a single needle valve on a low pressure system.
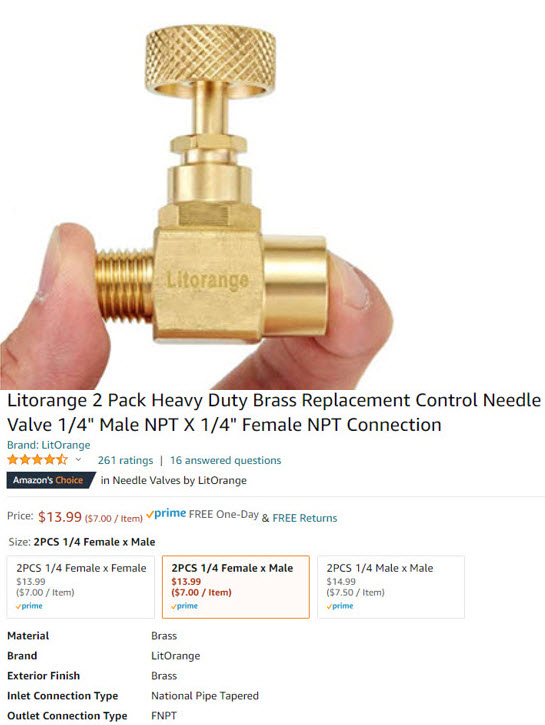
On a high pressure system open up both of the valves completely. Then reduce the flow in one to a fast drip. Then use the other valve to reduce to the slower drip rate one desires. I find this setup necessary as the needle valves seem to be difficult to control when only one is in a high pressure system. Two in series work much better. This is the needle valve I’m talking about:
Note there are a lot of different arrangements which will accomplish the same thing. A pressure reducer with a needle valve will also work well. It just costs more. Just drop the pressure to 5 to 10 pounds and then add a single needle valve.
I cannot emphasize enough that if the system is inside a dwelling one MUST use piping approved by the uniform building code for use with potable water systems. Do not use compression fittings and something like irrigation tubing or aquarium air tubing fittings without hose clamps. The standard irrigation tubing or aquarium air tubing fittings WILL FAIL. And a high pressure system can put out an amazing amount of water overnight into the wood of a home. And insurance will NOT cover the damage (insurance only covers plumbing failures where the plumbing met code).
Low Pressure Drip System
Put a water pressure reducing valve in a place where it won’t freeze. Then move the water to one’s aquariums through low pressure pipes per the building code in your area. Drop the pressure in the incoming water pipes to 5 to 10 pounds with the pressure reducing valve. This is great for multiple tanks in a home.
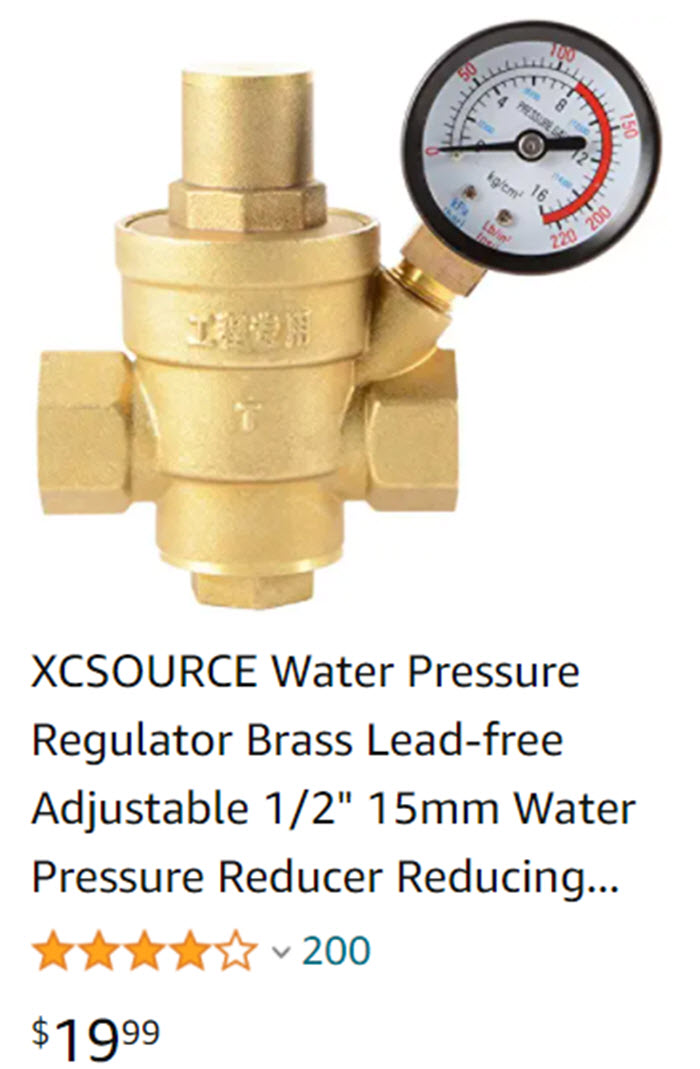
By separating the high-pressure incoming tap water piping from the low pressure internal piping, one simplifies the installation somewhat and prevents disasters from a high-pressure line rupturing or leaking. It is also easier to get low drip rates. Needle valves don’t work very dependably with high pressures but work great with low pressure water.
With a low pressure system at the aquariums it is POSSIBLE BUT NOT RECOMMENDED to use flexible lines to the aquarium with push on pressure fit fittings. But one has to use both beverage tubing and hose clamps. One can use 1/8″ ID X 1/4″ OD X 1/16″ wall clear beverage tubing. But modify the push-on press fit fittings by using ¼ inch hose clamps over the press fit tubing connections. The clamps mean it won’t come loose and flood the house. There are no clamps which will work with aquarium air line tubing and fittings so aquarium air line tubing cannot be used, even in a low pressure system.
Note I prefer half inch schedule 40 PVC even for low pressure systems. It is just a lot easier and very reliable. If one steps on a beverage tubing you can inadvertently dislodge it from a fitting and get a leak. Step on a properly joined schedule 40 PVC joint and nothing happens.
Using a Reservoir
With chlorinated water it is best to use a reservoir to remove the chlorine or chloramine. In Tempe Arizona I had a system where I had a tank on a high stand on a porch outside my home. I had a toilet float valve that controlled the high pressure water flow from the Tempe water supply. The outside tank had a six inch deep gravel under-gravel filter on it. I would add some food every few days to keep the undergravel active and “alive”.
The water fed via gravity (i.e. very low pressure) to some ten aquariums in the house. The feed was via half inch schedule 40 PVC to single needle valves. As an option I could have added a small fountain pump or powerhead to feed the water rather than using a high tank and gravity feed.
In all probability the under-gravel filter was removing the Tempe chloramine before it got to my fish. I didn’t realize this until I got a note from BrentL about his battle with chloramine and a drip system.
Chlorinated Water
Chlorinated water can present a challenge. Fish are just very sensitive to both chlorine and chloramine. With chlorinated water it is best to set up a reservoir in a garage or patio, feed a conditioner into the reservoir every few hours to remove the chlorine or chloramine, and then feed the water to the aquarium(s) via a small low pressure pump. Alternatively set-up a large, active, mature filter on the reservoir to remove the chloramine. This advice comes after I received the following communication from BrentL
“I recently installed a drip water change system based on your “blue print” and it’s been working really well. I used PEX tubing, a pressure regulator and a needle valve in the set up. For someone who knew nothing about plumbing, it feels fantastic to have accomplished this project. It is simply amazing knowing that I never need to change water again! So thank you!
One thing unexpected though was that I still need to treat the chloramine in the water. The chloramine does not oxidize fast enough to not stress my fish. My tank is about 180 gallons, including the sump. The sump has 100+ pot scrubbers, well filtered. I started out dripping at only 0.5 gallon per hour directly into the tank. After about 3 hours, I was surprised to see that some of my fish (all rainbows tank) started to feel stressed – loss of color, surfing against the return outflow, twitching as if to shake off irritants. Those signs go away a few hours after I stopped the dripping. Then I tested the dripping a few more times over days, the results were the same – fish were stressed.
My tap water only has 0.5ppm of chloramine. Pool test strip shows minimal (almost undetectable free or total chlorine). Interestingly, the drip water even runs through a huge whole-house Pentair water filter (20 inches tall) dedicated for the drip system. I initially decided to add it just for the peace of mind. The filter should be the best on the market as it boasts being one of the few to use catalytic carbon, as opposed to activated carbon which only removes chlorine. And the company targets that filter specifically for chloramine. To be fair, we all know, and the product does say, catalytic carbon can only reduce chloramine, not remove. So, there will be some residual chloramine.
What I ended up doing is that, instead of dripping directly into the tank, I drip into a 14 gallon “reservoir/evaporation tub” which is connect to the sump tub via a ½ bulkhead. Then I add a small dosing pump (Kamoer X1 Pro) to dose Prime into the reservoir every few hours, for a total of 5ml per day (I can probably get away with less). That way, the new water will be treated in the reservoir and slowly flow to the sump. Fish no longer show any signs of stress now. They look happy!
Then I went back to revisit all the Youtube videos that talked about their drip systems. I began to realize that most of them do not pre-treat their water, and they did mention their water only has chlorine. Though, they all use an under-the-sink type of activated carbon filter to remove chlorine. There were a few that had chloramine in the water, and they use either a dosing pump or a holding tank to treat the water. I wonder if that’s a coincidence.”
Now I had some ten aquariums on a drip system in Tempe Arizona where they treated the water with chloramine. I did not add any conditioner to the system and I had no problems. But my set-up (described in detail above) had a mature deep bed under-gravel filter in an outside reservoir that was probably removing the chloramine. So I didn’t see any problems. The under-gravel filters removed the chloramine before it could get to the fish.
Based on what BrentL saw, I would now recommend a preconditioning reservoir and conditioner pump to treat the water if one is on chlorinated municipal water. An alternative is a reservoir with a sizable mature filter on it to remove the chlorine or chloramine. Chloramine turns out to be rather difficult to remove rapidly with just an organic load. Chloramines require either addition of a conditioner or multiple passes through a high organic medium like a deep bed under-gravel filter.
Note if one does the drip system in copper pipe do not worry about copper poisoning in shrimp and the like. Copper poisoning is only found where acid water or slightly salty water sits in copper pipes for extended periods of time. This type of copper poisoning is very rare.
RO Drip System
The reservoir feed can be from an RO system. This is useful if one say has very alkaline water and wants a lush high tech planted tank. The RO water needs some remineralization (typically a solution of plaster of Paris and Epsom Salts). The remineralization can either be by a dosing pump or by a bypass from the tap water line to the RO unit.
A Drip Set-up that is Truly Impressive
Ron Demers, probably the best African Cichlid breeder there is (mouth watering gorgeous fish!), set up a new breeding facility in the Carolinas which used a continuous drip water change system. It is a huge and very impressive operation, done very well and very professionally. Ron has a YouTube video on the facility which I recommend to anyone who wants to see perfection in action.
Note Ron uses air operated sponge filters in his tanks for converting ammonia to nitrate. Note also Ron transitions to schedule 40 to aquarium air line tubing with just adhesive for his drip water system. But his facility is outside where a leak will not be a huge problem. I do not recommend that inside a home. And Ron uses well water so he doesn’t need to worry about chlorine or chloramine.
Ron uses a HUGE amount of water to change the water in each of his tanks once every twenty four hours. He is using thousands of gallons per day in a very impressive operation.
Drip Systems in More Depth
Joey (the King of DIY aquariums, one of the best aquarium system designers I’ve run across) also used a continuous drip water change system and loved it. So you know these systems work.
Joey set up a very inexpensive drip change system with a drip irrigation system pressure reducer and airline tubing. I cannot recommend such a system. The plastic on these types of airlines and drip irrigation lines “creep” and relax and come loose in less than a year. This will give one leaks. Schedule 40 is more expensive but one soaked floor can eat up a lot of money to repair.
Joey’s irrigation system pressure reducer drip system could easily be used with a schedule 40 PVC distribution piping to give a simple, inexpensive and dependable drip water change system.
Joey did incorrectly state that large water changes are needed every two or three months with a drip water change system. He calculated that the nitrate level would continue to increase with a continuous water change system. He was simply wrong. If you simply increase the number of drops per minute one can drop the limit on the nitrate to any level one desires, the nitrate level will reach a “maximum”.
To understand this intuitively think not of the water coming in but think of the water going out the overflow. If a hobbyist feeds his fish one fifth of a gram of elemental nitrogen (as protein) per day and has a continuous drip water change system, then at some point one fifth of a gram of elemental nitrogen (as nitrate) will flow out the overflow per day. At that point the nitrate level is stable and can’t rise any further.
To drop the nitrate level, simply increase the number of drops per second.
Another common misconception is that continuous water change systems don’t flush out the water anywhere near as efficiently as a 50% water change. This simply isn’t true. To illustrate, say a drip system is set up on a 100-gallon aquarium. To equal the flushing of a 50% water change about 68.7 gallons of water will need to be dripped into the 100-gallon aquarium (there’s actually an ap that calculates this!). This small inefficiency isn’t a major problem unless your water costs a lot.
The app can be found at Hamasreef.com. In a 100 gallon aquarium, dripping in 0.43 milliliter (nine drops) per second of water is a 50% water change in a one week time frame using 260 liters of water or 68.7 gallons of water (0.43x60x60x24x7)/1,000 = 260).
Also note that one needs to cycle any aquarium water filter that is part of the system BEFORE turning on the drip system. Any water change, including drip water changes, will remove the nutrients required for the beneficial bacteria to grow.
Rate of Drip
Only SLOWLY drip the water into the aquarium if you are paying for your water. You don’t want a huge water bill. For instance one can aim at changing 50% of the water every 14 days. With a 100-gallon aquarium that is 5 gallons per day (a 50% change with a drip system requires 70% of the water be dripped in):
- There are 20 drops in a milliliter
- There are 3,785 milliliters in a gallon
- There are 60x60x24 = 86,400 seconds in a day
- 5 gallons x 3,785 milliliters x 20 drops = 375,000 drops per day
- This equals four drops per second
The water cost is typically about $2 per month for each 100 gallons aquarium if doing 50% once every two weeks. In some areas like California you can double or even triple that cost. Now obviously if you have a well you can ignore these numbers and go ahead and pour the water in at a heavy rate.
The water can exit the aquariums to waste via several devices that keep a level of water in the aquarium and don’t let it overflow. These designs can be found at the following link:
14.7. Overflow Devices
Drilled aquariums with overflows also work well. If one has a sump lower than the aquarium the overflows or drilled holes to drain need to be in the sump for a drip water change system. The same overflows which work for aquariums also work exactly the same for sumps.
Other Water Change Systems that I do NOT Recommend
There are some YouTube videos of people who put their drip systems on timers. Huh? Why? The logic fails me. You just have added a valve or a pump that can fail and leak for no discernable reason.
There are also several videos of large breeders who have “semi-automated” hard piped systems which did 50% water changes to 20 or more aquariums in “only” five to eight hours once a week or so. Some are very well done with very professional (and expensive) copper piping and valving. They all had very complex (and expensive and prone to malfunction) hot water mixing valve systems to provide water at the proper temperature for the fish. If the water isn’t from a well, there needs to be some provision for removing chlorine or chloramine from the water.
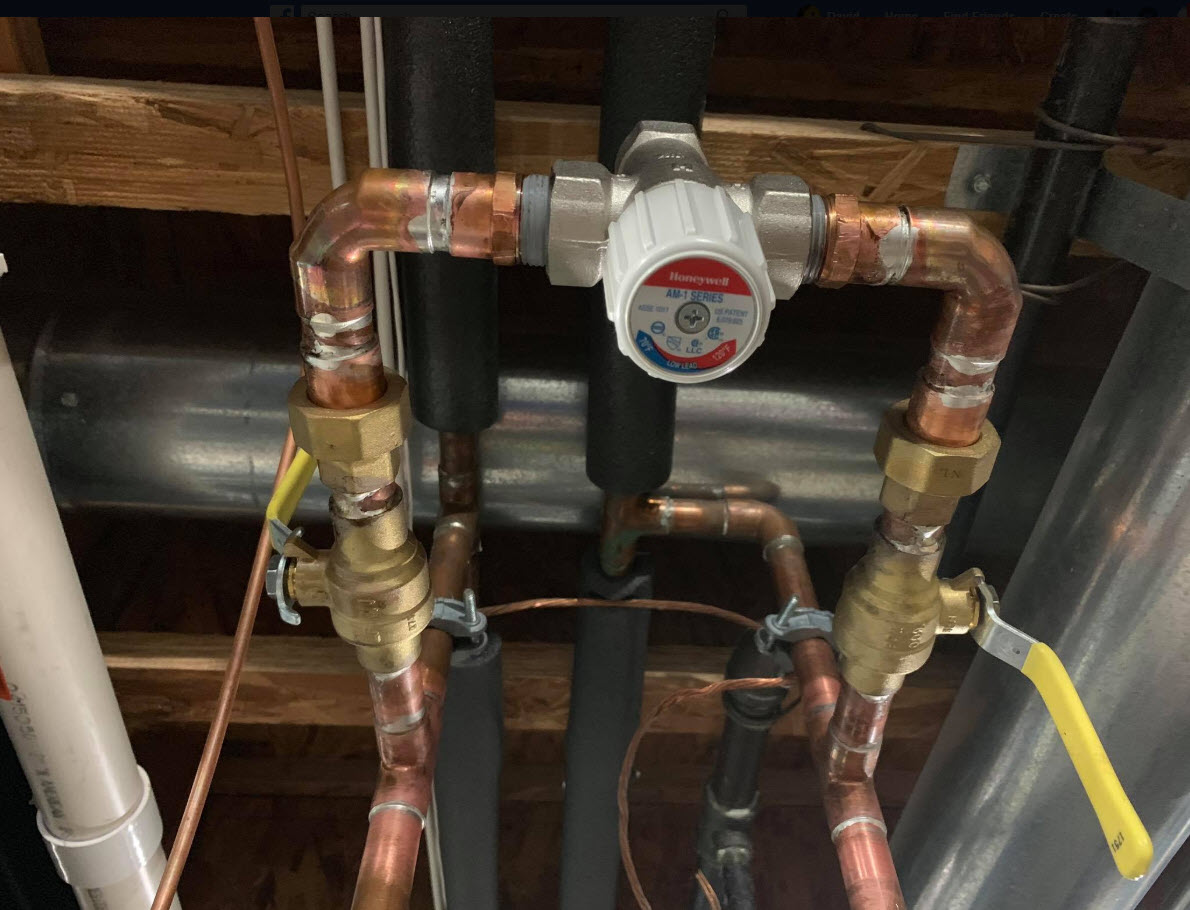
This is somewhat confusing as, with much less effort (and much less money!), they could have had a continuous drip water change system which takes no time to make the water changes. Maybe the price of water has something to do with it.
More Information on Water Changes
There are some aquarium hobbyists who are interested in delving deep into the science and the calculations behind all aspects of the hobby. For those who are so inclined the following is pertinent:
18.1. Aquarium Water Changes
18.1.1. Water Changes in Depth
18.1.2. Water Change Math
18.1.3. Water for Water Change
.
Return to Maintenance Menu
.
Aquarium Science Website
The chapters shown below or on the right side in maroon lead to close to 400 articles on all aspects of keeping a freshwater aquarium. These articles have NO links to profit making sites and are thus unbiased in their recommendations, unlike all the for-profit sites you will find with Google. Bookmark and browse!
.
Dave says
Jeremy …. Sounds good to me. I’ve got no ballpark figures to go on. And some brown water squeezings from existing sponge filters will be great to add to the pretreatment tank.
Jeremy R says
Yeah, I was thinking that its not an exact science, but I appreciate some ballpark figures!
Are there any ballpark limits that I could use to extrapolate the numbers?
Eg, 5 passes through the media bed is required.
Dwell time required? (lols)
i.e. UGF with a 4W powerhead = 300LPH.
Barrel = 200L
barrel = 55cm diameter
Bed depth = 20cm
Bed volume = pi x (55/2) ^ 2 x 20 = 47,516 (cm^3) ~47L
Ignore volume of media in the following calculations (this will then overestimate the values)
Passes = 5
Total flow required = 200 x 5 = 1000L
duration for 5 passes (hrs) =1000 / 300 = 3.33 hrs
Bed dwell time achieved…
Duration in bed = 47L / 200L x 3.33hrs = 0.78hrs ~ 46mins [is this right?]
Based on 5 pass requirement, maximum rate of water change is ~200/3.33 = 60 LPH
Now, thanks to: https://www.hamzasreef.com/Contents/Calculators/EffectiveWaterChange.php
for my 1700L tank, I would slow this down to 7 LPH, and that would give me a 50% weekly water change.
Now, at 7 LPH, this effectively would 8.5x the dwell time (6.5hrs) and the number of passes through the media bed (42.5).
Based on this, I think its pretty safe.
What do you think?
Any harm in taking some sponge filters out of my tank to help pre-seed the media bed?
Dave says
In reply to Jeremy R …. I had an eight inch bed in a thirty gallon octagon tank. Not an exacting science, just a deep bed.
Jeremy R says
Hi Dave,
Thanks again for your work.
Yes! Lets do both, a deep gravel bed for filtration and with an autodosing pump with dechlorinator.
Is the 8inch bed based on using a water barrel, eg a 50-60 gal barrel? Or would the bed need to be different in that case?
Cheers
Dave says
In reply to Aaron …. To fail safe the chloramine removal add TWO systems that will do the same thing: one a dosing pump and one a eight inch deep undergravel filter that is kept alive with weekly food additions. Be sure to cycle the reservoir undergravel with daily food additions and no water changes for at least a month.
Aaron says
@ Dave
Thank you for responding. I was setting up a more manual type system due to high chloramine in the source water. But you have me re-thinking. My big worry is the auto dosing pump failing and all of my tanks getting hit with chloramine. There would be no clear indicator of failure beyond stressed fish.
Any fail-safe ideas?
Looks like adding a pressure reducer is a good idea regardless. Thanks for that tip. And my 44 gallon reservoir is plumbed to a drain.
Dave says
Aaron …. In order to equalize the flow one can use any of several float valve designs on the incoming water. They work best with a pressure reducer to 5 to 8 psi. Be sure to have an overflow to waste water in case the valve malfunctions.
And as for pumps simply use a 4 watt powerhead.
Aaron says
You mention you do not like timers/valves for drip system. If the source water has chloramine and a reservoir must be used. How do you equalize water going INTO the reservoir with water LEAVING the reservoir?
Am I missing something simple?
Also, sort of pumps are used on setups dripping to 5-10 tanks? I’m not sure what type of pumps would offer the low flow needed if being ran 24/7.