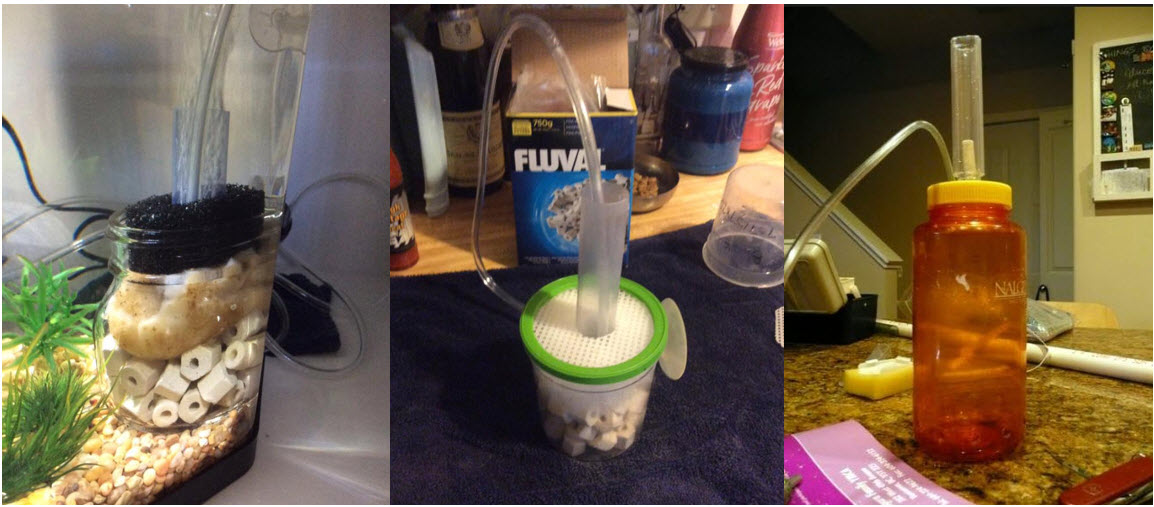
People with small tanks need inexpensive ways to filter these aquariums. While I heartily recommend under-gravel filters for these small aquariums, many hobbyists do not want to go that way. They want a planted aquarium, soiled aquarium, or they want a sand substrate. Sponge filters are not liked by many because they are ugly. So below we describe some sixteen different alternatives.
First off we need to identify two different types of pumps to use in some of these designs:
.
Equipment
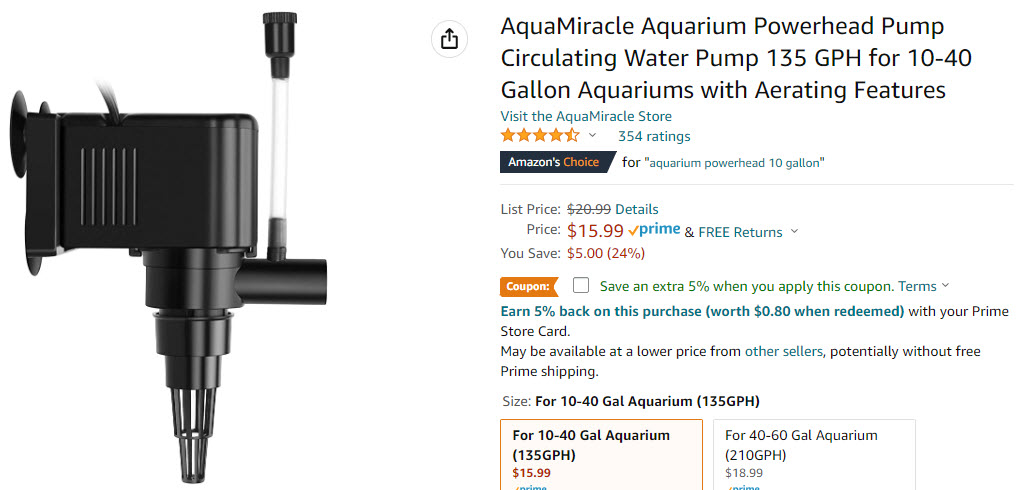
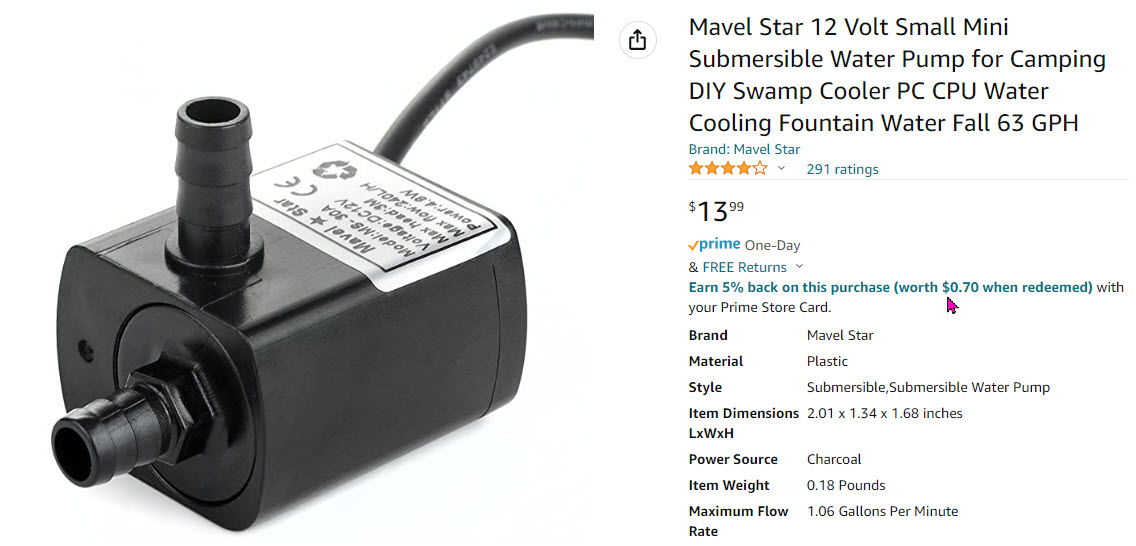
There are two types of pumps I will use here-in. One is a powerhead pump, and one is a small 12 volt fountain pump ( a USB mini-pump can be substituted for this).
All these designs use only K1 media or plastic pot scrubbers. The only alternatives here for K1 are plastic straws cut up into quarter inches sections. Cut up gray (fine) or blue (somewhat fine) Matala pads or uncut straws can be use in place of pot scrubbers.
Foam won’t work unless it is cut to the perfect size and shape. Polyester fibers will rapidly plug so that can’t be used. Media that do little for biofiltration in these small filters include Matrix, Biohome, bio-balls, lava rock, or any ceramic media (ceramic rings, ceramic balls). Don’t use these media.
Static Media DIY Wide Mouth Filters.
There are three designs which will work about equally well for wide mouthed static media bottle filters. One is air operated and two are pump operated.
Design #1
.
The air operated design above can use any wide mouthed bottle design, such as these plastic jars found on Amazon.

These plastic bottle can be found in 8 ounce, 16 ounce, 32 ounce and 128 ounce sizes. Many other types of containers can be used with just a little bit of imagination. Note the screw on top can either be at the top or at the bottom of the design above, it makes little difference.
Here is another wide mouthed design (can also be simply a cut off water bottle or almost ANY container):
Design #2
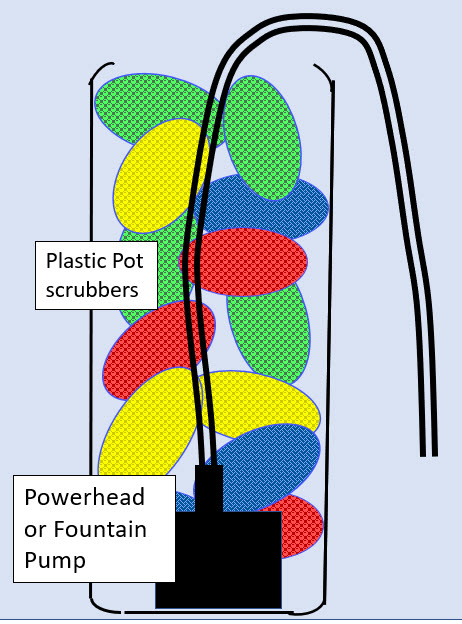
Design #3
Still another obvious variation is simply:
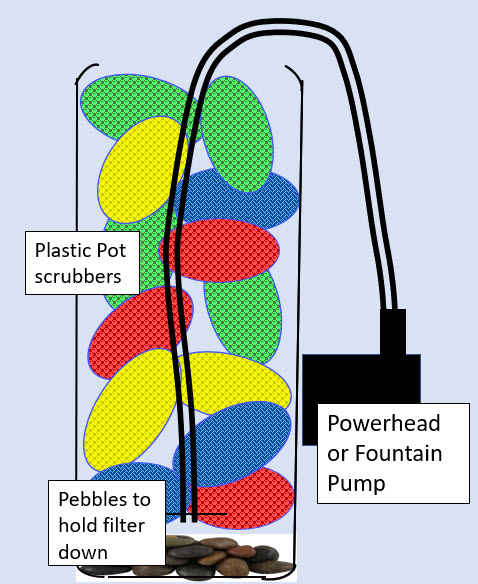
All these variations look best with black paint on the outside of the bottle or jar. All these variations will work the best if the flow goes through the filter media first, then gets pulled through the pump. This filters out debris that could plug the pump.
Water Bottle Filters
The following two static designs use simple water bottles and electric pumps:
Design #4
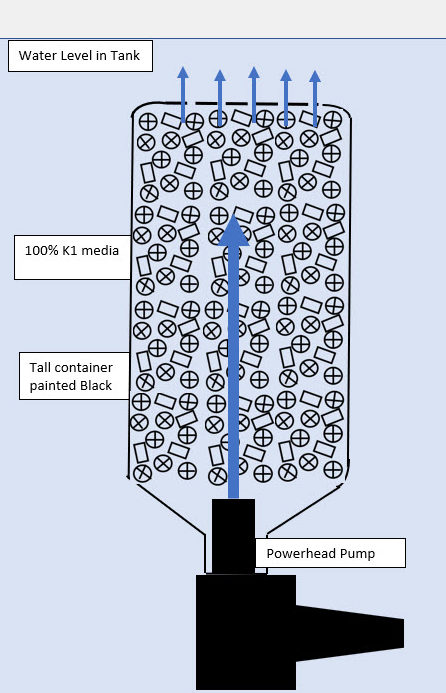
The K1 media in this design is NOT fluidized. It will pack down around the top of the container. For this static filter any K1 will do although micro K1 is preferred. The biggest problem with this filter is getting small quantities of K1 media. If one can find it in small quantities the price is just outrageous.
Design #5
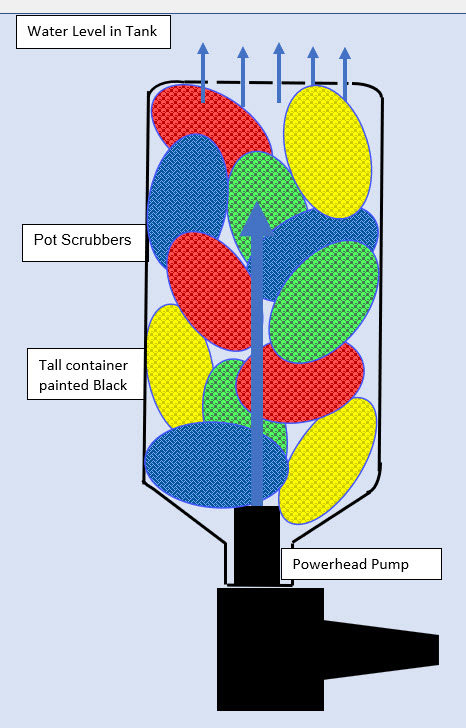
The biggest problem with this filter is getting the pot scrubbers into the bottle. Note that pot scrubbers can be easily disassembled, cut up, and simply stuffed into the bottle in small rolls or pieces. Or one can use a wide mouth bottle, leaving the top on the bottle.
Capacity of Static Media Bottle Filters
All five of the filters above have the same capacity as far as the number of fish they can filter. If a 16 oz (1 pint, 1/2 liter, 29 cubic inches) container is used this is the number of fish which can be filtered and give crystal clear, very healthy water (100 square feet of filter area per pound of fish):
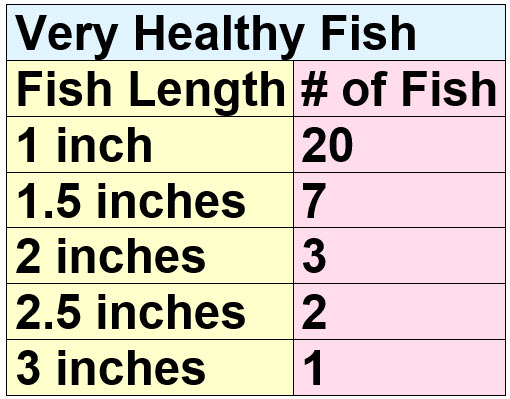
If one is willing to accept some cloudiness to the water and fish which are in reasonably good health (20 square feet of filter surface area per pound of fish), one can stock at the level below with these three filters. I do recommend one go up to this level slowly over six months or so. Do not clean these filters unless they plug up. Note that these charts are independent of the size of the aquarium.
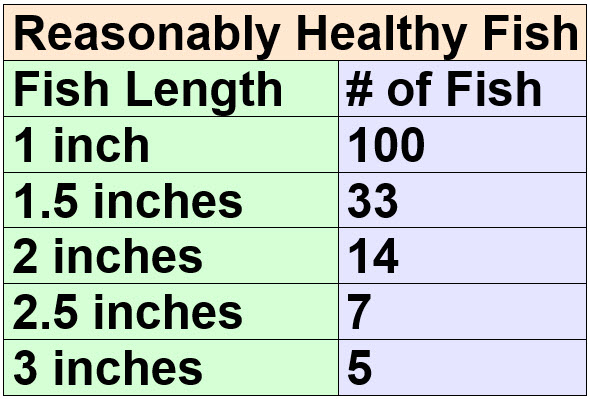
These numbers are ONLY for small half liter bottles. Obviously if the container is a two liter water bottle, quadruple these numbers.
Fluidized Bed Bottle Filter Designs
These designs have pumps which force the water through a micro K1 fluidized bed. This is important. One must get flow THROUGH the bottle. There are fluidized bed bottle filters that Joey or Cory talk about which use only air to get the micro K1 circulating. These filters have very little flow THROUGH them and are thus very poor filters.
We have come up with some designs that will work as the flow is through the filter. The easiest way to make this filter is to simply add a small fountain pump to either Joey or Cory’s designs. Simple. Easy
Design #6
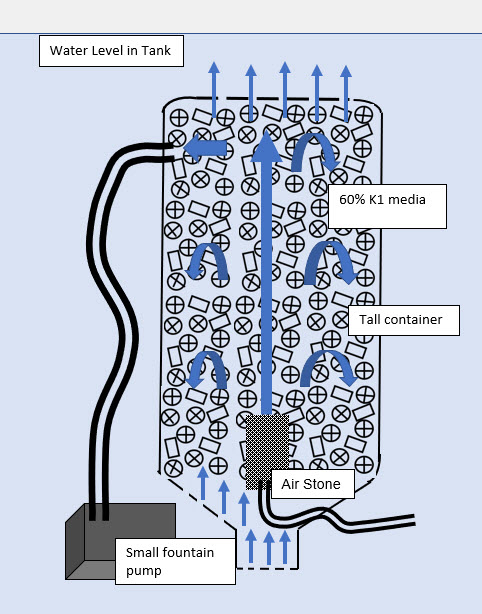
Again, it is best if the flow is out of the bottle and pulled into the pump. This way large particles are broken up before they reach the pump.
Design #7
Below is a design for a water bottle fluidized bed micro K1. This filter aerates the water well but it is noisy. If the bottle is 16 ounces or less micro K1 is the only media which will work. Getting the K1 to fluidizes takes patience, like four to eight weeks before it starts moving.
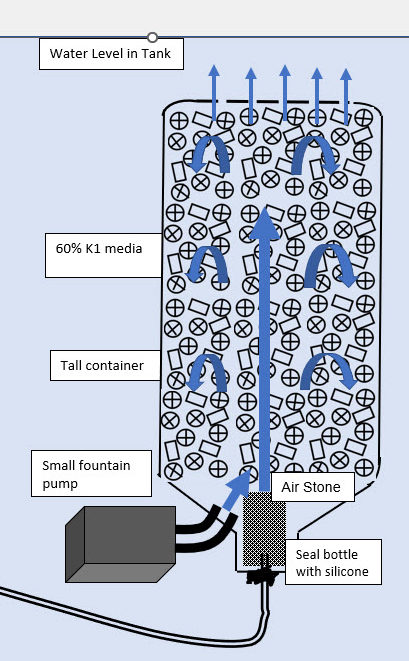
Here is another fluidized design.
Design #8
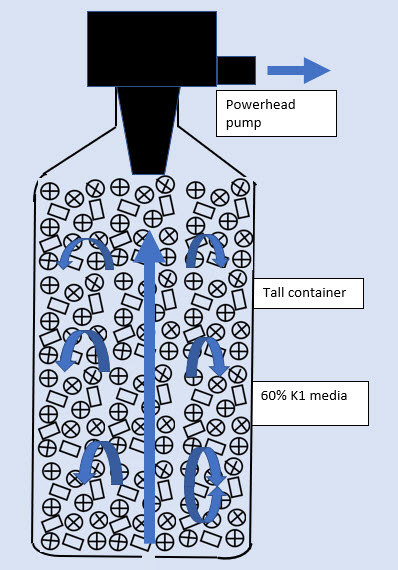
This design does not have the aeration of the first fluidized bed bottle filter but it is quieter. Sometimes the K1 just refuses to properly fluidize. Adding a short length of tubing at the bottom hole can help by creating a jet flow. Again, if the bottle is 16 ounces or less micro K1 is the only media which will work.
All three of the fluidized bed micro K1 filters end up being roughly twice the filter of the above static designs on a cubic inch basis if one can get the micro K1 circulating.
Under Substrate Pipe Filter
In this design a small fountain pump pulls water out of a two inch diameter PVC pipe with two drilled end caps. The pipe is stuffed with as many pot scrubbers as one can force in. The pipe is buried in the substrate at the back of the aquarium.
Design #9

This “under substrate pipe filter” is a great design for a small planted aquarium. The pipe can be hidden under the gravel at the back of the tank. The pipe can also be painted to blend in with the sand or gravel. I recommend to just force the caps on with some pressure and then leave the assembly unglued. This way one can take the pipe apart and clean it every year or two.
Note this can easily be two pipes lying parallel or one pipe which snakes around the aquarium. This design is especially attractive for a Walstad aquarium as it is very low flow and will not add the dreaded aeration, the enemy of any planted aquarium.
Another version of this design uses plastic straws instead of pot scrubbers. Note straws are very expensive if purchased over the web via something like Amazon. Amazon hates shipping all that air. But I found some very cheap in my local Dollar Store. The straws work quite well. Micro K1 will also work in the pipe.
Design #10

These pipe filters are surprising in how much they can handle. If one puts this into a 20 gallon the pipe can be 20 inches long. If one makes the pipe 2 inch diameter the volume comes out to be about 60 cubic inches. This is twice the volume of the 16 ounces bottle filter designs above. As a result this filter can do twice the fish numbers of the above 16 ounce static media bottle filters, equal to the 16 ounce fluidized bed filter bottles.
This pipe filter can be easily completely and totally hidden even in a very small aquarium. This makes it very attractive for something like a small beta tank or any nano aquarium. Note that a 1.5 inch pipe diameter gives about half the capacity of a 2 inch pipe.
It is important in all the above designs using fountain pumps have the direction of flow to be pulling the water through the media into the pump. This filters out large particles and prevents fouling of the pump.
Pipe Under Substrate Filter
This “under the substrate” filter is a very attractive option for ANY aquarium with any type of substrate. One takes a series of 1½ inch PVC pipes, fills them with media, caps them and then connects them with small flexible tubing. One then adds a small fountain pump which pulls the water through the filter.
The capacity of this arrangement is huge. And other than the small pump it can be all out of sight in the aquarium under the substrate. This is the first iteration:
Design #11
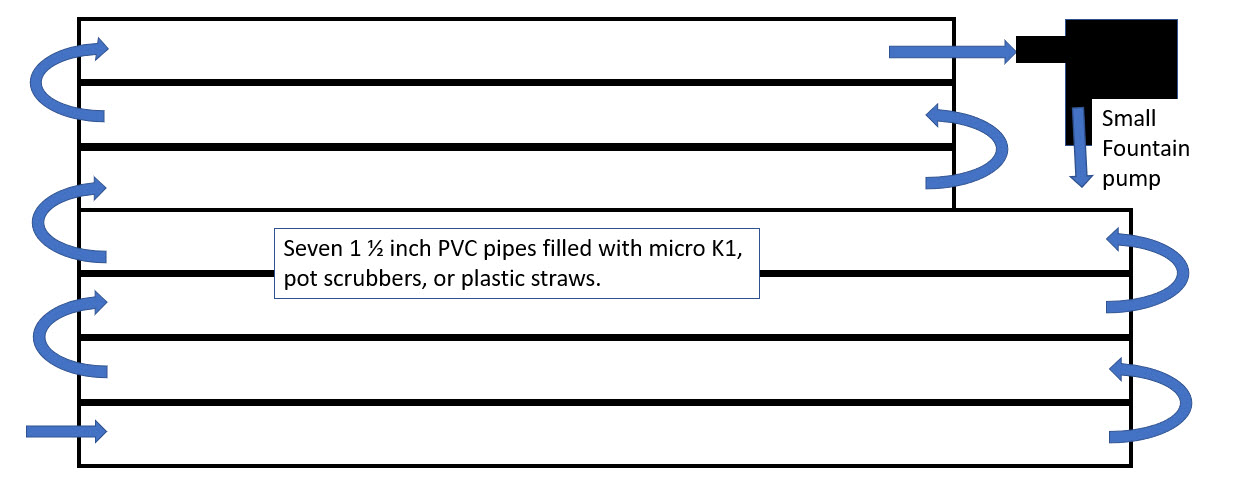
In a 20 Gallon Aquarium this will be three 16 inch sections and four 20 inch sections. This gives an astounding 226 cubic inches of filter tucked out of sight. This filter has considerable advantages:
- Other than the pump it is completely out of sight
- It cannot leak
- It has a huge capacity
- It is very silent
- Compatible with ANY substrate: Sand, gravel or aqua-soil
- Compatible with any substrate arrangement: dirted, wood pellets, Father Fish, “High tech” etc.
- Low flow deep in the tank is great for any planted Tank
- If one paints the tubes and caps it can be invisible even if it gets exposed.
It has a few disadvantages:
- The pump craps out on a regular basis and there is no good way to know it has crapped out.
- It raises the depth of the substrate by close to two inches
- It does not give any aeration
- If it plugs, the aquarium needs to be torn down to get the filter out and clean it.
- The pipe fittings can be expensive
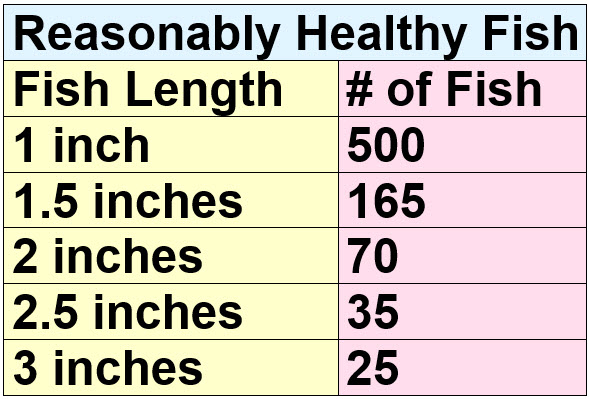
The capacity of this filter for a 20 square feet per pound of fish filtration in a 20 gallon aquarium (i.e. decent filtration with “dull” water) is as follows:
More importantly, the capacity for a 100 square feet per pound of fish filtration in a 20 gallon aquarium (i.e. great filtration with “crystal clear, very healthy” water) is as follows:
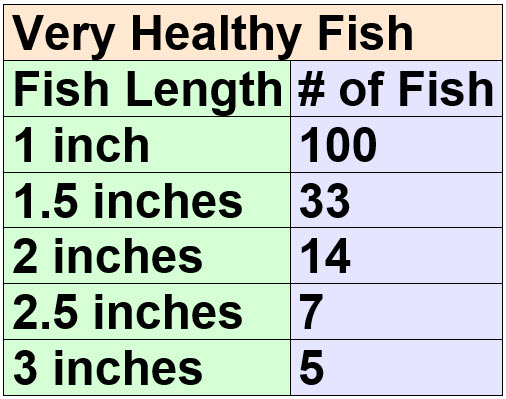
This filter is pretty amazing!
Now there are many many variations. One can split the flow as shown below.
Design #12
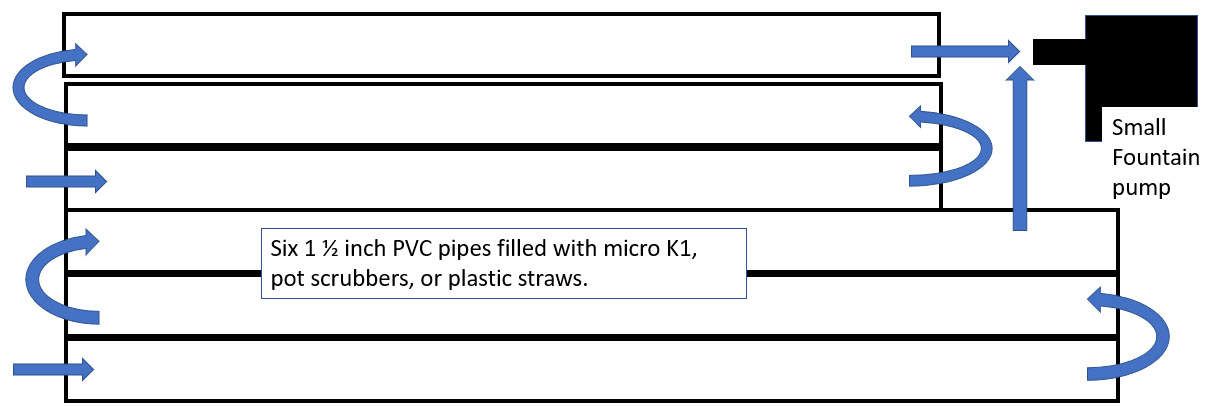
In a larger tank one can use two, three or even four fountain pumps with associated piping, hidden behind and under rocks or logs.
Pipe-on-Back-Wall Filter
This is a version of the filter above. It differs in that instead of being placed under the substrate it is placed along the back wall of the aquarium. This type filter has considerable advantages:
- If it is painted black on a black background it will not be easy to see
- It cannot leak
- It has a huge capacity
- It is very silent
- Compatible with ANY substrate: Sand, gravel or aqua-soil
- It does not raise the level of the substrate
- Compatible with any substrate arrangement: dirted, wood pellets, Father Fish, “High tech” etc.
- Low flow deep in the tank is great for any planted Tank
- It can be taken out of the tank and backflushed to clean it without disturbing the tank.
It has a few disadvantages:
- The pump craps out on a regular basis and there is no good way to know it has crapped out.
- It does not give any aeration
- It takes some plumbing skills to set it up
- The plumbing fittings get expensive
The capacity of this filter for just a little more than the two pipe designs above. Here is the basic layout:
Design #13
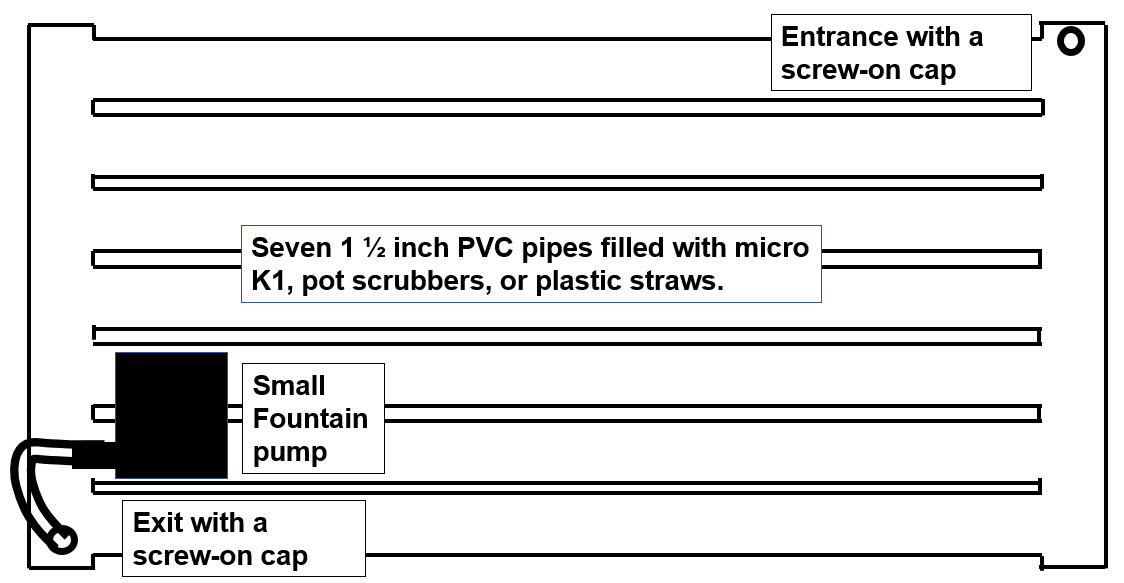
This has the following features:
- Seven one and one half inch pipes filled with micro K1, pot scrubbers or plastic straws.
- An exit on the lower left where a tube to the pump is put through a hole drilled into the pipe framework and sealed with silicone adhesive.
- An entrance that can consist of just a drilled large hole (in the cap) or several drilled large holes.
- Both the exit and the entrance corners have a transition to a three quarter inch NPT threaded cap. These two caps can be removed and the whole thing flushed with a garden hose to clean it.
- All pieces save the two caps are firmly glued together.
This assembly requires some skill with a saw. The fourteen tees that make up the framework assembly need to have the two wings cut back to nothing in a very straight and true manner. This is the cutting involved:
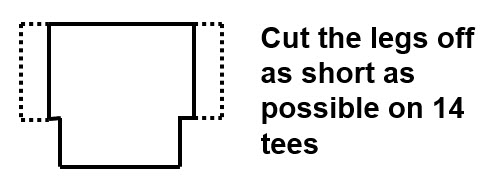
These tees need to then be assembled with very short (one quarter inch long) pieces of one and one half inch pipe.
Note that the one and one half inch tees can be replaced with three quarter inch tees and 14 reducer pieces. The 14 reducers go from one and one half inch pipe down to three quarter inch pipes and tees. This makes the assembly much easier to make but slightly more expensive. This is a schematic of this type of design:
Design #14
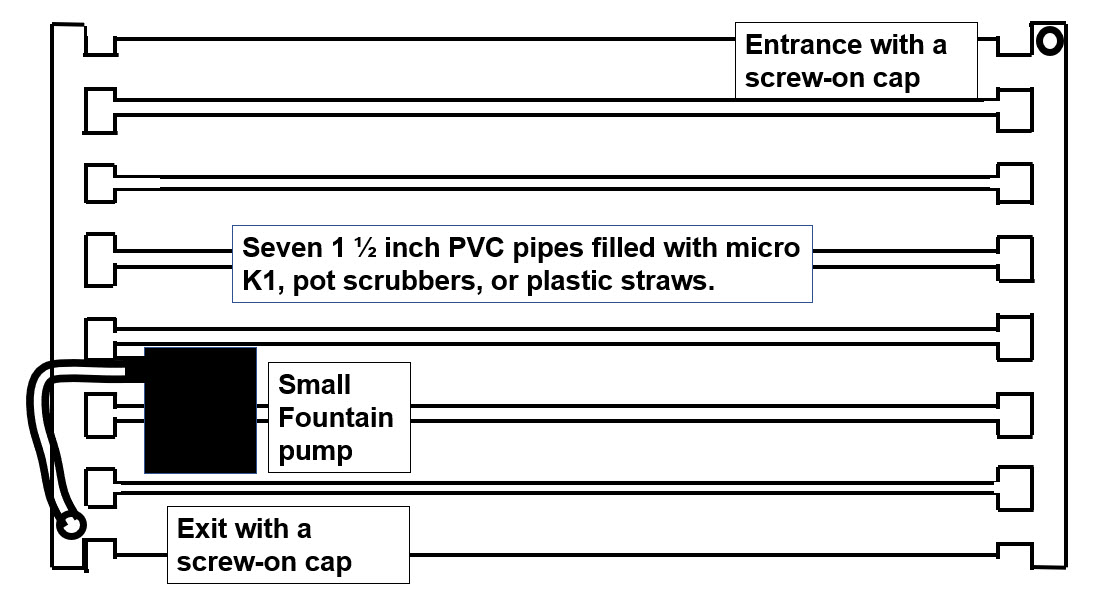
Obviously everything needs to be filled with media before it is assembled. And micro K1 will require some pot scrubbers at the entrance and exit to prevent the micro from exiting when the assembly is flushed.
The entire assembly needs to be painted black (or made of black PVC). It becomes virtually invisible against a black background. Note that it is very important the whole assembly have all its joint surfaces sanded and primed before using the PVC adhesive. It is very frustrating for the whole thing to just fall apart because the joints were not properly prepared. Also prime the entire surface before painting it if you want the paint to stick.
There are a whole series of options that can be implemented:
- For a fish only tank the exit and entrance can be switched and an up direction fountain pump installed which aerates the water.
- This design is for a 20 gallon. Obviously large tanks can have larger versions and smaller tanks can have smaller versions.
- A lightly stocked Low Tech, Hybrid, Hau or Walstad aquarium can have a single pipe running across at the lower back of the aquarium. It can even be partially or completely buried.
Altogether this is a very useful low cost filter design.
It is important in all the above designs using fountain pumps have the direction of flow to be pulling the water through the media into the pump. This filters out large particles and prevents fouling of the pump.
Variations on a Theme
There are many types of containers out there that can be made into static filters with pot scrubbers, micro K1 or straws. It is simply changing the type of container in most of the above designs. One such container is below:
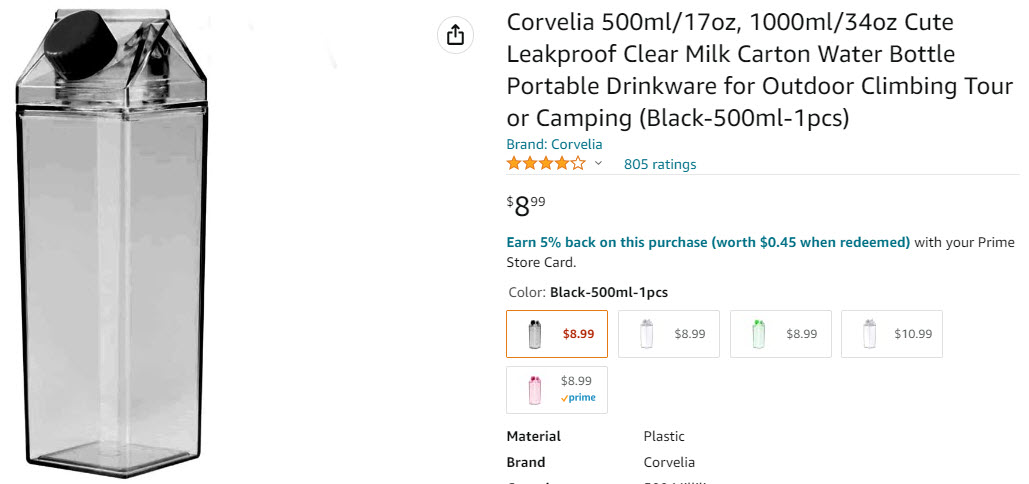
Because this container is square it has a greater capacity. It is a low profile 2.4 inches by 2.4 inches. This container can be used for most of the designs above. If one takes the container and drills holes in the base, you can epoxy two or even three or four together to makes versions of the pipe filters.
Here is a simple version of a milk carton filter:
Design #15

This can be built as follows:
- Take two half liter plastic milk cartons and cut the bottom out of one and the top out of the other.
- Epoxy the two together
- Drill holes in the bottom of the 2.4″ x 2.4″ by 16 inch
- Stuff the cartons with pot scrubbers, micro K1, or aligned straws
- Add a tiny fountain pump with a tube
- Silicone the tube in place
This small filter can be painted black, dark brown or even camouflage. Then just put it in the lower back of any aquarium. It can be placed either vertical or horizontal. This will give 32 ounces, 1 pint or 1 liter of static media. This gives a fish capacity of twice the level of the first two charts above. There is no aeration and very little water movement making this a great filter for a Hau, Walstad, low tech or hybrid planted aquarium.
The Betta Filter
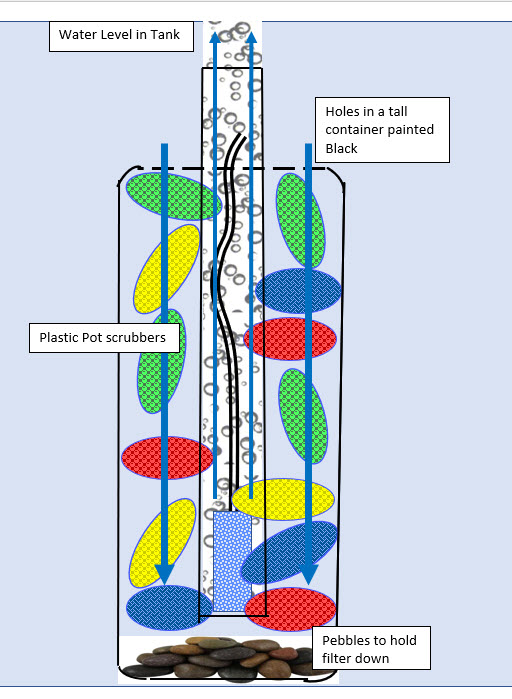
In the article on bettas we show a filter that will give good aeration with little water movement. This is the design:
Design #16
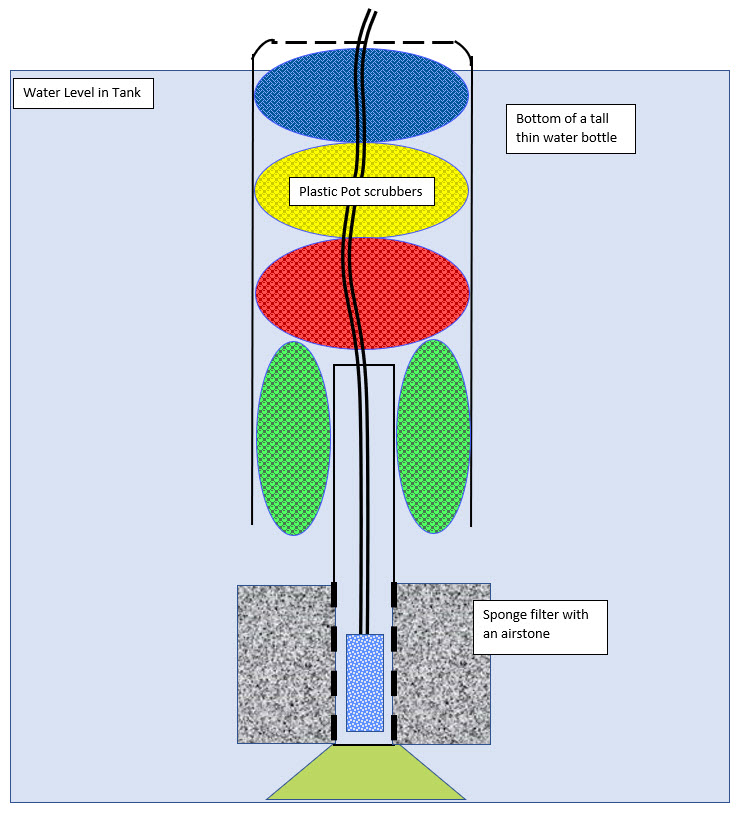
Probably 80% of the extra pot scrubber biofiltration will be in the green pot scrubbers. But probably very roughly 20% of the biofiltration will be in the red, yellow, and blue pot scrubbers. More important, easily 80% of the aeration will take place in the red, yellow, and blue pot scrubbers.
This all points out that there are a million ways to do this. I gave you sixteen designs that I came up with but anyone with some imagination will find many more.
A Pump Box
The small fountain pump above tends, for some enigmatic reason, to be difficult to find at times. There is another far more common design with an inlet that is an open grill. This pump requires some rework. An open grill inlet will plug with debris very frequently and need some provision to screen the debris out.
One can wrap them in foam but that is ugly and, quite honestly, doesn’t work very well. A better choice is to enclose the pump in a plastic container. In this manner the water inlet can be though the entire mass of filter media before it hits the pump, reducing fouling considerably.
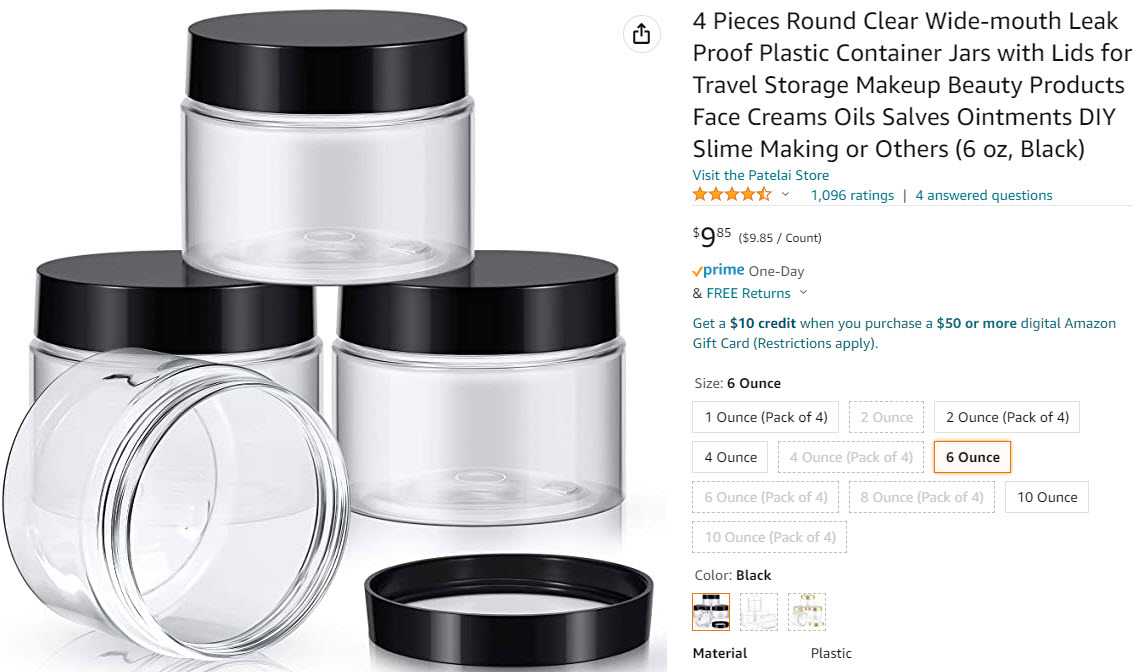
The way this works is as follows:
- select a plastic wide mouth bottle about twice as wide and high as the pump.
- Cut a hole in the side large enough to put the electric cord through it
- Put the pump into the container
- Put a short outlet hose from the pump exit to the outside of the bottle
- Put a long inlet hose to the inside of the jar
- Tape and silicone the hole securely shut
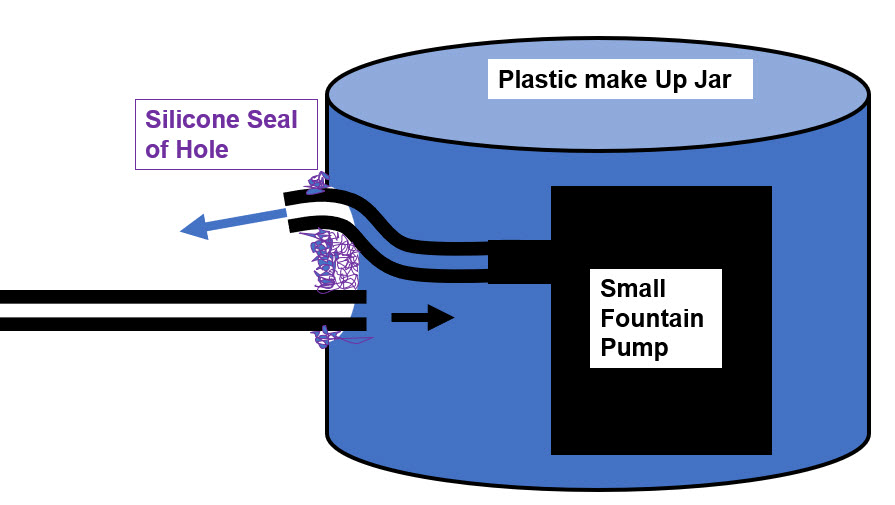
This assembly can then be used in place of the fountain pump illustrated above. This is a pump design for those who cannot get the other fountain pump design.
.
Return to Filters Menu
Return to Miscellaneous Filters Menu
.
Aquarium Science Website
The chapters shown below or on the right side in maroon lead to close to 400 articles on all aspects of keeping a freshwater aquarium. These articles have NO links to profit making sites and are thus unbiased in their recommendations, unlike all the for-profit sites you will find with Google. Bookmark and browse!
.
Ginger says
The cheapest and easiest aquarium filter I ever built was a air stone that I threw in a pickle jar and covered with used gravel. Threw it in a new aquarium and never had nitrate issues. I didn’t even have a lift tube
Dave says
In reply to Elisha …… Powerheads but no pot scrubbers is the optimum. Plenums work best when empty.
Elisha says
Dave,
I’m about to set up a planted 20-long using a UGF with two uplift tubes. Would putting pot scrubbers in the plenum and using tiny fountain powerheads for the uplifts be beneficial, or is the old-school empty plenum with still airstones better?
Dave says
In reply to Vladimir … The 1% of metabolic weight is the “gold standard”. What a fish can eat in one minute can be off by a factor of five from the gold standard.
Dave says
In reply to Vladimir …… It is just slang for stopping working for any of a dozen or so reasons.
Vladimir Kontul says
I also do have additional question:
Should I assume that: 1% of metabolic weight for feed loading = what fish eats in one minute once a day ?
Just trying to put certain rules of thumb you propose together
Vladimir K, says
Hallo, I am new to the hoppy and I really wonder what filter ‘crapping out’ means.
Dave says
Facu …. I just use cheap spray paint from Walmart. I’ve never seen an issue, including on glass.
Facu says
Hello Dave, what kind of paint is safe for aquariums? And what kind do you recomend for painting the glass?
Mark says
In your picture the pump is buried. I would think the outlet would need to come out above the substrate? I haven’t used a small pump like this before so I’m not sure how much flow it creates.
Thanks again, Mark
Dave says
In reply to Mark …. Pot scrubbers are better. Pot scrubbers can be cleaned, straws need to be replaced. Eight 1/8th inch holes should do the job nicely. And the pump has two pipes coming out from the body, one the entrance and one the exit.
Mark says
Hi Dave,
I am planning on setting up a 20 long planted tank and thought the pipe filters looked like a good idea. Do you think the straws or pot scrubbers work better? Will one need to be cleaned sooner than the other? Does it matter how many holes in the end or what size? Where does the water come out from the pump?
Thanks, Mark
Dave says
Brad UK I would simply place the two filters in series with only one motor running. Break the surface tension with a simple duckbill aimed upward at an optimum angle. If you are really concerned about aeration you might use the aerator design in the betta article. But I think that is probably unnecessary.
Brad - UK says
Hi Dave,
I have read your aeration pages and note it is about surface area agitation, whether from an outlet or bubbles breaking the surface. So that I understand, I assume the designs above (those that provide aeration) work on the same concept that it must agitate the water surface to create good aeration.
I ask because I have two canister filters in my small 25G aquarium, and I would ideally like to use one as an aerator which does NOT contribute to flow, whilst the remaining is used for gentle flow circulation – as well as still using the filtration capability of each. At the moment, the two together are too strong for my small fish, no matter how I position them.
So I was thinking about using one of the outflows to point down, placing a tube around it and then using an opposing force to create the turbulence. However, I cannot see how that design is going to create a lot of surface agitation to create a good level of aeration in my moderately stocked tank. (i.e., the tube with opposing forces is going to allow for only a small amount of surface agitation due to the diameter of the actual tube – and a bottle is going to be quite space-consuming in a 25G tank).
I hope this makes sense. But do you have any ideas? I dont need the filtration capability of the above designs, but I do need to make a highly aerated aquarium but with flow that is not too powerful for the fish.
Thanks as always.
Brad
Dave says
In reply to A Skippo The foam needs to be cut very carefully to avoid water just bypassing the foam. The easiest way to cover up the color is just to paint the filter black. Problem solved.
And design #8 can be turned upside down. I’m just not too sure how it will work with CO2 injection.
A Skippo says
Thank you for sharing your knowledge and research with us. Why 30 or 20 ppi sponge are not recommended on these diy filters? I just think those pot scrubber are too colorful for my taste. (Bty they do sell them in white, grey,black mix color now).
Second question can design #8 be turn upside down with the pump at the bottom. I was to double it as CO2 circulator.
Thanks again
A Skippo
Dave says
Anonymous ….. If the DIY is PVC use PVC cement. If you have another type plastic hot glue guns will work just fine.
Anonymous says
Can you clarify what to use for the silicone to seal things on here? On the page on diy under gravel filters you mention silicone isn’t good for use with plastic. Would just hot gluing them instead work?